
InWin 101
Overall, for something that is under $90 at the time of writing, this case allows you to have an aesthetically pleasing build that has the PSU at the top. It has a very premium feel even though it does not include fans. The InWin 101 is a great case that I would recommend to anyone looking for an affordable mid-tower gaming PC case.
- Large bottom dust filter
- Easy tool-less tempered glass side panel
- Price
- Sturdy Construction
- Water Cooling Support
- Mounting for six fans
- Many cable cutouts to route cables
InWin is a company that is well known for its unique PC case designs and high-quality construction. They make cases covering every segment of the market from small ITX cases to large E-ATX cases.
Today, we will review a PC case that has been out for a little while, the InWin 101 Mid-tower gaming case in White.
This review is not sponsored by InWin and has been funded out of my own pocket.
InWin 101 Mid-Tower Features:
- Modest yet Sharp Luminous Front Panel: The 101 has a hidden power button, which discretely intermixes with the unique LED logo. The front bezel lights up as the system is powered on. To keep the front simple and clean, the front I/O is positioned at the top, which grants easier access for PCs stored under desks or tables.
- Accelerated Tool-less Design: 101 has perfected a tool-less design. The 3mm tempered glass side panel can be easily removed by pulling the clip and lift up. (Steel and acrylic side panel are available on request).
- Detail-oriented and Thoughtfully Designed: The 101 not only supports 2.5” and 3.5” drive bays, but also mounts with a specialized GPU holder that provides extra support and prevents your graphics card from sagging or unnecessary vibrations. The 2.5” SSD mounts cleverly positioned in the back of the motherboard tray, which avoids clutter and takes advantage of the interior space.
- Top PSU Chamber for Better Air Flow: The top PSU chamber not only makes the system cleaner, but also creates an ideal climate without interfering with the motherboard and graphics card area.
- Purge the Dust!: The bottom dust filter is highly accessible and is designed for quick removal. The embedded design allows users to remove the dust filter without any restrictions.
- Versatile Cooling Options: The 101 provides high flexibility with cooling performance. Overall, it can support up to 6 fans simultaneously, which enhances cooling performance and can create a stunning gaming rig!
InWin 101 Mid-Tower Case Specification:
- Dimensions: (WxDxH) 220 mm x 480 mm x 445 mm
- Weight: 7.35 kg or 16.2 lbs
- Material: SECC, ABS, PC, Tempered Glass
- Colors: Black, White
- Motherboard Support: ATX, M-ATX, M-ITX
- Drive bay Storage: 2X3.5” hdd, 4X2.5” hdd/ssd
- Expansion slots: 7 PCI slots
- Power Supply: Standard ATX up to 200 mm length
- Cooling System: Rear Fan: 120 mm x 1, Side fan: 120 mm x 2 or 240 mm radiator, Bottom Fan: 120 mm x 3 or 360 mm Radiator
- CPU Cooler Height: 160 mm
- GPU Card Length: 421 mm
- PSU Length: 200 mm
- Side panel: Steel side panel on back side and Tinted Tempered Glass side panel
- Front panel: Power button with LED
- Top I/O: 2 x USB 3.0, Headphone Jack, Microphone Jack
InWin 101 Mid-Tower Unboxing

Taking a look at the box it is your standard size Mid-tower box. The outside of the box has a nice InWin logo with the case title on it. One of the side panels of the box has which version is inside an also all the specifications of the case listed below.

Opening up the box you find the case surrounded by two large hard foam inserts along with a plastic bag to protect the case form dust or fingerprints. The tempered glass side panel does have adhesive protection still on it, so you can peel it off once you have finished assembling your build.


There is a bag located inside the box that has all of the included accessories and screws for the case. The instruction booklet included is pretty detailed and in color.
A Closer Look at the Case


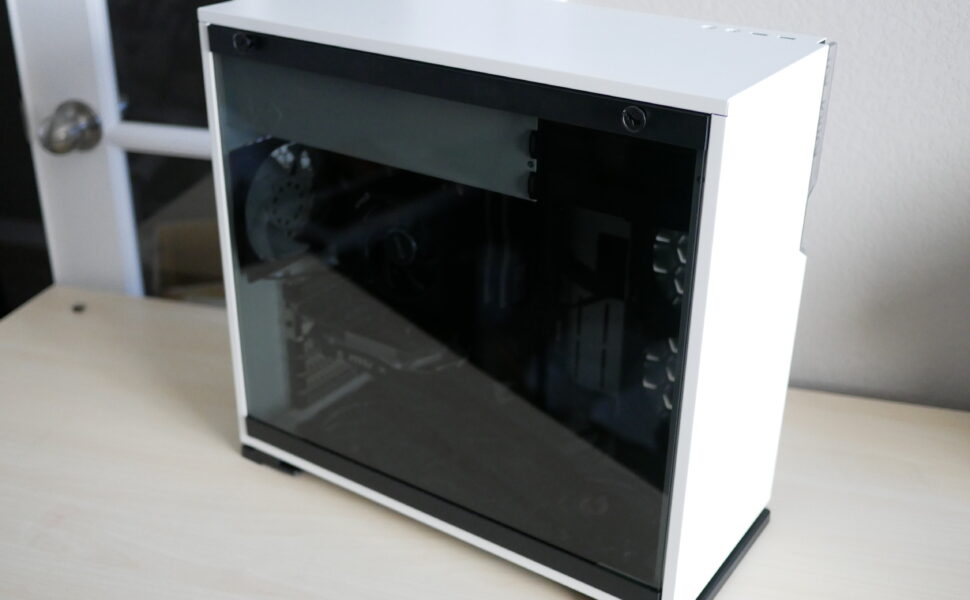
Starting out at the front of the case you are shown great style, with no intake fans at the front, just a solid front panel with the InWin logo at the top right, which also serves as your illuminated power button.

The Top of the case houses your top I/O, featuring your USB 3.0 ports and also a microphone and headphone jack.
The back-side panel has ventilation holes that are not filtered. The rest of the side panel is a solid sheet. The front side panel is made out of tempered glass.


It is secured by two clips and is easily removed by just lifting up. The back of the case sports your PSU at the top, followed by your rear I/O and finally your 7 expansion slots.
The bottom of the case has great case feet that provide a good amount of clearance for airflow. There is also a large 360 mm dust filter that can easily be removed to filter any air that is being pulled in from your bottom intake fans. There are no case fans included with this case.
A Closer Look at the inside


First, we will start by looking behind the right-side panel or the back of the motherboard tray. You are welcomed by a large CPU cutout in the motherboard tray to be able to mount your backplates for your air or liquid CPU cooler without removing the motherboard, this is great to see the flexibility included. At the top of the motherboard tray there are two cutouts to be able to route your fan cables and especially 8-pin + CPU power cables to their designated area. Below the CPU cutout, there are two places to mount 2.5” SSDs. Above the motherboard tray there is a large area for you to mount your PSU and manage your cables.
Next, we will examine the main chamber or what is behind the left-side panel. Looking at the front of the case there is lots of room because there are no front intake fans.


At the top in front of the PSU area is a drive cage for two 3.5 or 2.5” HDD or SSDs. The drive sledges that are provided are the kind that you bend and insert the drive-in. I do wish that the drive sleds expanded to insert the drive rather than having to bend the sled to fit the HDD. If you will be inserting an SSD into the drive sled, you just have to secure it with four of the provided screws.
Below the drive cage there is an area where you can mount 2 x 120 mm fans or a 240 mm radiator for intake.
At the bottom of the case you have space to put 3 x120 mm fans or a 360 mm radiator also for intake.


In the motherboard tray area you have plenty of space to mount up to a ATX motherboard and there are also tones of cutouts to be able to route your cables. I wish there was a bigger cut out at the bottom of the motherboard tray to route your HD Audio cable rather than having to route it on the bottom of the case next to the mounted intake fans. At the rear of the case you have your expansion slots, an area for your rear I/O and also space for a 120 mm fan.
At the top of the case you also have an area where your PSU can draw in air, you have to mount your PSU retrieving air from the inside of the case due to no area at the top of the case.
Test System and Build Impressions

The system being put in this case is my test bench setup. It consists of the following parts:
- CPU: AMD Ryzen 7 2700x
- Motherboard: Gigabyte Aorus X470 Gaming 7 wifi
- Memory: OCPC Gaming 16gb 2400 mhz
- GPU: MSI GTX 1050ti 4gb OC
- CPU Cooler: AMD Wraith Prism
- Storage: Crucial MX300 500gb nvme SSD
- PSU: Antec High Current Gamer Gold 650w
Starting off the installation, I installed the motherboard with no issues. The provided hardware made it a breeze. Next, it was important to install the PSU and route the cables. You have to install the PSU with the fan facing down as there is no intake for the PSU at the top of the case. While it does mean that your PSU has to intake hotter air, I’m ok with that since it adds a nice aesthetic touch by having a clean top of the case.
The case has plenty of room and several cable ties to secure cables down. I did not secure my cables down due to the limited time to complete the build. I still had no issues closing the side panel and InWin provides plenty of room behind the motherboard tray to route cables.

Next, was to install my additional SSDs, which was easy, as InWin easy mounting the SSDs due to removable trays with a single thumb screw. I also like how the trays are slightly elevated, as this puts less strain on your SATA power cables. Remember to plug in the HD audio cable and other motherboard cables before installing the bottom intake fans as they tend to get in the way of the connectors, once installed. The last two steps were to install 4 fans in the case (1 rear and 3 at the bottom) and the GPU. For this build, I did not need to install the GPU brace as my MSI GTX 1050ti is the ITX version as is not long enough to utilize the brace. I love how this GPU brace is included to help with saggy GPU problems.


The build went through without much trouble and overall, I love the look of the final build.
Conclusion
So, in conclusion, what do I think of InWins mid-tower PC games – the 101? Well, overall the build quality is top-notch despite not having any bundled fans in the box but, let’s face it, this isn’t going to be proper for any serious build. I don’t think I have come across bundled fans yet that is any good!
The build experience was decent and my hands lived to write this blog article, so no sharp edges. Overall, combining the above with aesthetics thrown in too, this is an absolute winner at just $90 in the USA and £130 in the UK making this an affordable gaming PC case.


