
FSP CMT 520 Case
Overall, I’m impressed by FSP. Their great quality from their PSUs has not only crossed over to CPU coolers, but also to cases. Their overall great attention to detail has made the CMT 520 a competitive case in the RGB/Tempered Glass category. If you $109 to spend in your budget, make sure to take a good look at including the CMT 520 in your build.
- Tempered glass side panel and front panel
- 4 x 120 mm fans included
- Great quality fan filters (top, front, bottom)
- Included RGB controller/Fan hub
FSP is a company that is known for its reliable power supplies and is now continuing to branch its products throughout the PC community. We’ve taken a great look at their premium CPU cooler, the Windale 6, which did great during our testing. Today we will take a look at their flagship case, the FSP CMT 520
Update
If you haven’t seen it already, we have also reviewed the FSP Tempered Glass, RGB – CMT 510. It’s a great case that really builds upon this foundation.
FSP CMT 520 Features:
- Front and Side Panel Window: With tempered glass windows on the front and side panel, every powerful component of your system is on display for all to enjoy.
- Flexible Cooling Options: The CMT 520 is complete with four pre-installed 120mm RGB LED fans. This case ensures that your cooling performance will never suffer from support for up to three additional120mm/140mm fans and compatibility for up to two 360mm radiators. With plenty of space, you could even modify the case with a professional water-cooling setup.
- Find your Personal Color: The CMT 520 comes standard with 4 pre-installed 120mm RGB LED fans (3x on the front panel and one on the rear panel) and a built-in LED controller for vivid lighting. The RGB LED light control buttons are conveniently located on the front panel. Four light modes, complete with the Sync RGB feature, are your gateway to stylish computing.
- Streamlined Airflow: With three 120mm RGB LED fans in the front and 120mm RGB LED fan pre-installed in the rear, you will always be off to a cool start.
- Upgraded I/O Panel: Two USB 3.0 and two USB 2.0 ports promote high-speed data transfers and expansion potential.
- The Ultimate Expandability: The CMT 520 supports most mainstream motherboard form factors such as E-ATX, ATX, Micro-ATX, and ITX, while the PSU is conveniently installed at the bottom of the case.
FSP CMT 520 Specification:
- Dimensions: (WxDxH) 215 mm x 495 mm x 510 mm
- Weight: 8.5 KG
- Material: SPCC, Tempered Glass x 2
- Colors: Black
- Motherboard Support: E-ATX, ATX, M-ATX, M-ITX
- Drive bay Storage: 2X3.5” hdd, 4X2.5” hdd/ssd
- Expansion slots: 8 PCI slots
- Power Supply: Standard ATX up to 200 mm length
- Cooling System: Rear Fan: 120 mm x 1 (pre-installed), Front fan: 120 mm x 3 (pre-installed) or 360 mm radiator, Top Fan: 120 mm x 3 or 360 mm Radiator
- CPU Cooler Height: 163 mm
- GPU Card Length: 423 mm
- PSU Length: 200 mm
- Side panel: Steel side panel on back side and Tinted Tempered Glass side panel
- Front panel: Power button with LED
- Top I/O: 2 x USB 3.0, 2 x USB 2.0 Headphone Jack, Microphone Jack, RGB selector
FSP CMT 520 Unboxing


First, let’s start with my favourite part of the review, the unboxing. Taking a look at the front of the box, it is decorated with a unique picture of the case, the case model, and an image of an anime character. Looking at the first side, you have features listed about the case.
The backside of the box is an exploded view of the case that displays the different features included in the CMT 520. The second side has all the specifications of the case listed.


Opening up the top of the box, you are presented with two large closed-cell hard foam pieces that secure the case that is covered by a plastic bag. One nice touch is that one of the box flaps shows you how to get the case outside the box. Rather than trying to reach in trying to grab the case, you are supposed to turn the box upside-down and lift the box off of the case.
The instructions for the case are detailed pictures of the different features in the case. This is black and white but is a nice touch to include still detailed instructions about the different features of the case.
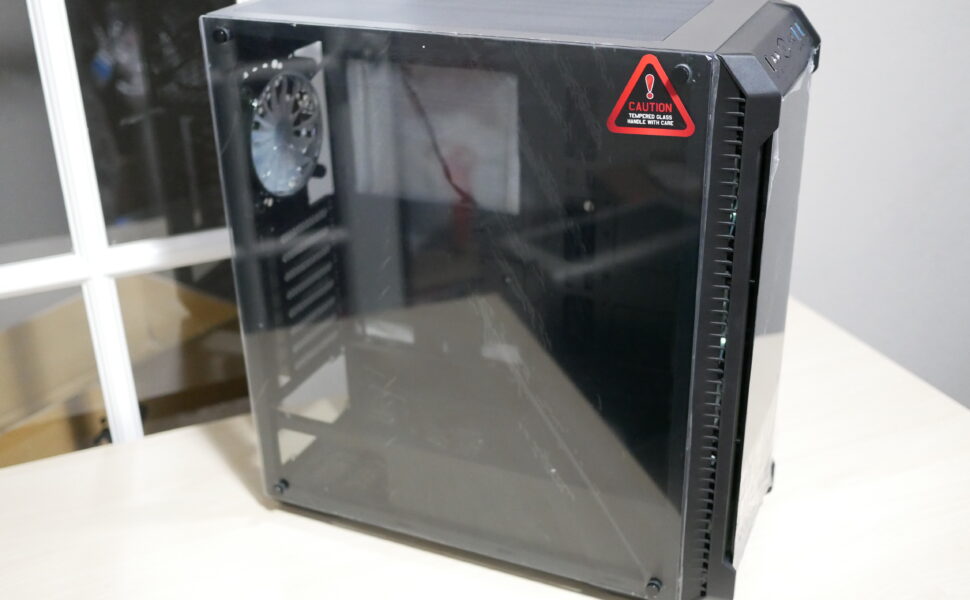
A Closer Look at the Case


Starting with the front of the case, you are greeted with a nice large tempered glass front panel with the FSP logo at the bottom. Intake air is taken from the side and bottom of the front panel. The front I/O starts with 2 USB 2.0 ports, HD audio ports, a large power button, a recessed reset button, an RGB selector and 2 USB 3.0 ports.
The top of the case is perforated and has room for 3 X 120 mm fans. It also has a nice large removable dust filter to keep the dust out of your case.


The side panel is secured by two small thumbscrews. You won’t find any bulges or pop-outs to help with cable management. It’s ok. There is plenty of room behind the motherboard tray to route cables. The rear of the case has mounts for a 120 mm fan that can be moved to make room for any clearance issues.
Then there is your rear I/O cutout, your 8 PCI slots and lastly, your PSU bracket.


The bottom of the case is pretty plain, with the standard PSU dust filter. FSP provided a high-quality dust filter and not just a flimsy piece of mesh. The left side panel is a nice large piece of tempered glass that is secured with thumbscrews. This panel is straightforward to remove and replace.
A Closer Look at the inside


Taking a look behind the right-side panel, you notice right away there is a foam piece that is holding the wrapped PSU cover plate. You also notice that there are a lot of cut-outs and tie-downs to be able to manage your cables.
There is also a fan hub/ RGB controller that included being able to control the 4 RGB fans included with the case. Below the large CPU cut out is an SSD plate that is secured with a thumbscrew. There is also a drive cage in the PSU basement that can support two 3.5” drives.


Taking a closer look at the main chamber, you are greeted by the 4 x 120 mm RGB fans included, 1 in the rear and 3 placed at the front of the case. Also, there is room behind the fans and a cut out in the PSU bay that can support up to a 360 mm radiator and the fans at the front of the case. You can also notice the many mounting points for reservoirs and an area to place two more SSDs.
Above the PSU area, there is room to put a PSU plate to cover the area. There is a nice cutout that allows you to display which PSU you are using. There are four foam pads included making sure your PSU is elevated for increased intake. There are also nice cutouts above the PSU areas, which allow easy routing of your USB and HD audio cables at the bottom of the ATX motherboard. As previously mentioned, there isn’t much of a motherboard tray due to the large CPU cut out. Having this large cut out does weaken the integrity of the motherboard tray a slight bit, but the case is still solid as a whole, especially once the side panel are installed.
Overall, the interior is fairly standard, aside from the PSU cover. The all-black interior and included LED fans brings a welcoming aesthetic that will go with almost any build.
Test System and Build Impressions
The system being put in this case is my test bench setup. It consists of the following parts:
- CPU: AMD Ryzen 7 1700x
- Motherboard: Asus Crosshair VI Hero X370
- Memory: Gskill Ripjaws V 16gb 3200 mhz
- GPU: MSI GTX 1050ti 4gb OC
- CPU Cooler: FSP Windale 6
- PSU: Corsair TX 650w


Building, in this case, was a joy. There were no difficulties at all. With the included screws and accessories and a screwdriver, I put the parts above in to complete the build in a great time. Even with the large Windale 6, it was able to fit in the case with ease.
With the great aesthetics of this case, it makes almost any build complete.


